Daylight saving time ends in the U.S. at 2 a.m. on Sunday, November 5, when those who observe the calendar ritual will set their clocks to “fall back” one hour. This means that areas that follow the practice will “gain” one hour of sleep that day and gain extra minutes of morning daylight each day as winter approaches.
Daylight saving time is practiced in most of Europe, most of North America, and parts of Asia, South America, and Oceania. For regions that observe daylight saving time, it involves changing clocks by one hour in the spring and fall to give people more hours of daylight. Clocks are set to “spring forward” by one hour in the spring to align with daylight saving time and “fall back” by one hour in the fall to reset to standard time.
Many people are accustomed to a number of electronic devices updating automatically and not having to take any action. However, products such as Windows and Mac computers can have some hiccups when attempting to adjust back to standard time.
If you find you’re having trouble with your computer automatically updating to standard time, consider some of these fixes.
Windows: correct your time zone in Settings
A simple option for attempting to correct a Windows computer that won’t update automatically is to make sure your PC is set to the right time zone. If you’ve changed your time zone manually while traveling, for example, you could have accidentally disabled the automatic update for the daylight saving time feature. Luckily, there are several fixes you can try. This one, the simplest method, requires you to go through your Settings.
It should be noted that the screenshot below is for Windows 10, but a nearly identical menu exists in Windows 11 under Time & language in the Settings app. Alternatively, you can access this menu by right-clicking the time displayed on the bottom-right side of the Taskbar. From there, just click Adjust date and time.

Step 1: Select Windows + I. This will bring up the Settings window. Then choose Time & language > Date & time.
Step 2: From here, if the Adjust for daylight saving time automatically feature is grayed out, you will need to change the time zone.
Step 3: Toggle off the Set time zone automatically option to open the Time zone drop-down menu for editing.
Step 4: Select your proper time zone.
Step 5: You should then see the Adjust for daylight saving time automatically option toggled on.
Step 6: Also, make sure Set time zone automatically and Set time automatically are toggled on again.
Windows: correct your time zone in Control Panel
This time zone fix is also fairly simple, but just takes a little digging into your device’s internal clock. It requires you to go through your Control Panel.

Step 1: Select Windows + R.
Step 2: Select Control > Enter. This will open your computer’s Control Panel.
Step 3: Select Clock and region > Date and time. This will open the Date and time settings window.
Step 4: Select the Change time zone button.
Step 5: This will bring up a new pop-up, from which you can select your proper time zone from the drop-down menu.
Step 6: Select the Automatically adjust clock for Daylight Saving Time check box option below the drop drop-down menu.
Step 7: Select OK to save changes. Then select OK again.
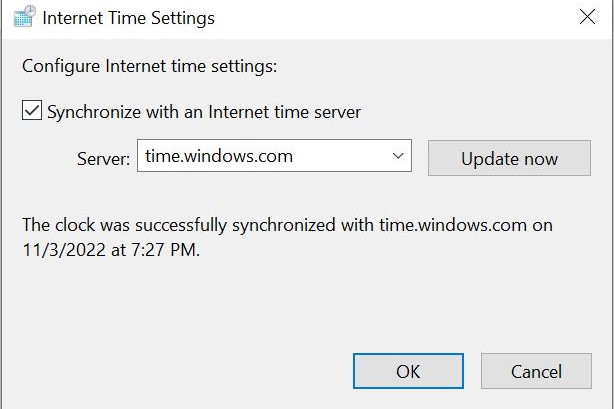
Windows: synchronize with internet time
If your automatic update issue is not as simple as fixing the time zone on the computer, you may need to attempt to match your computer with internet time. The two ways to do this are by syncing to the Windows time server or the NIST time server.
Step 1: Select Windows + R.
Step 2: Select Control > Enter. This will open your computer’s Control Panel.
Step 3: Select Clock and region > Date and time. The Date and time settings pop-up will appear.
Step 4: Select the Internet time tab > and the Change settings option.
Step 5: Select the Synchronize with an Internet time server check box option and select the time.windows.com server from the drop-down.
Step 6: Select Update now.
Step 7: Select OK after the synchronization is complete.
Step 8: If the Daylight saving time feature is still grayed out in Settings, test the second option by selecting time.nist.gov in the Server drop-down menu and updating the Settings again.
Mac: fix for macOS High Sierra or later
Newer Mac computers have easier mechanisms for automatic updates for daylight saving time. However, if you do run into any issues, Apple does have some steps you can take to remedy the problems. Keep in mind, this fix is for Macs running macOS High Sierra or later. There is also a fix for older Macs below.

Step 1: Ensure your Mac is connected to the internet.
Step 2: Select Apple menu > System preferences > Date & time.
Step 3: If you see a message that says Updated time zone information is available, restart your Mac.
Step 4: If that message does not appear, quit System preferences, wait several minutes, and open Date & time again.
Step 5: You should see a time zone update message at the bottom of the Time zone settings in Date & time preferences. From here, you should restart your Mac to get the update.
Mac: fix for older macOS versions
If you have an older Mac, your best option is likely to update the computer manually.
Step 1: Select Apple menu > System preferences > Date & time.
Step 2: In the Time zone settings, deselect Set time zone automatically using the current location, then choose your desired time zone.
Step 3: Depending on the system version, you might need to select the lock option to save these settings and set the changes.